The need for terrain
I did not have this really planned for this dev loop but I realized I could not go further into exploring new mechanics if the environment was not a little more representative of my vision for the final game. In other words, if your game play relies a lot on the environment, these cannot stay completely abstract forever.So I decided I needed to build some new test environments, and figure out an efficient pipeline for creating natural-looking terrains.
I looked for terrain software (I didn't want to sculpt all by hand) and purchased a license of the excellent World Machine, a node-based software specialized in the generation of terrain. I love it because it does only one thing and it does it really well. No fancy renderer included or whatnot, just building nice terrain data, wonderful.
So, eager to test this new software, I put up a simple node graph to create an island and get instantly some great results:

Only that my environment is all made of tiles, so I needed to figure out a working pipeline within this constraint.
Unique terrain or tiles?
In Tiled (the level editor I'm using), you can import multiple tilesets, each with its own tile size. So potentially you can have one layer with a single gigantic tile (like a unique terrain) and on top of that have a tileset with actual tiles (like the buildings or whatever).So the question came to my mind, should I pursue in the use of small tiles both for the terrain and for the elements on top of it, or should I create a unique terrain for each map, with tiles on top?
Creating a unique terrain is very tempting. First because visually it is unique, and thus can have recogniseable features and shapes and be truely beautiful, with no repetition whatsoever. Second, because it all can be generated procedurally, while still having the ability to control the local features thanks to World Machine's fabulous vector layout capabilities.
But the sheer size of a unique terrain (even if limited to an island) poses serious challenges, both in term of memory and performances. To reduce memory usage, the traditional method is to have a set of repeating textures that are blended over the terrain depending on various criterion such as height or slope. You can also use low resolution masks (such as erosion) to further enrich your texture blending composition.
The main issue with this approach is that it requires a significant amount of computation and texture fetching per pixel. For instance if your shader requires a normal map, an albedo texture, a specular intensity map, a specular gloss (roughness) map, even by combining some of those, you'll need 3 samplers. And that's only for one material. Say you want at least some grass, rock, sand and snow, you're good for 12 samplers. And that's not counting any mask nor any shadow samplers. You could easily reach the 16 samplers limit of model 3 pixel shaders (which some of my targets are bound to) and yet have a rather poor material library.
Add to that the cost of blending all these, and you can say goodbye to your 60 fps on any machine but the PC.
With tiles on the other hand, you have a unique material (or texture) for each tile with no need for complex shaders to compute or blend multiple textures.
Generating the tiles
Tiles are great in many ways. They offer a terrific compression ratio. With a relatively small library of tiles you are pretty much limitless with the size of your map, and with the right use they can become barely visible for the average Joe. However, working with tiles can be such a pain, especially when you have the additional constraint of allowing your tiles to rotate by 90 degrees (which I do). Add to that the increased complexity of a 3rd dimension and you really are in trouble.Fortunately, World Machine has the ability to create file-based input nodes (as opposed to fractal or random noise only) which allows the user to somewhat direct the tool.
So my plan was to create a set of hand painted 2d tiles (64x64 pixels) in Photoshop that would be the input node for World Machine to start with:

Here you can see I determined a few altitudes and transition. Black is sea level, dark grey is ground level, middle grey is my highest flying level and light grey up to white is blocking. Some tiles are repeated and rotated for test purpose.
I then input this control texture in World Machine for further processing. You can see the full graph of my first terrain implementation that generates a height field and a color texture :

World Machine has the ability to subdivide its world into regions (or tiles as they call it, but these do not necessary mean they repeat seamlessly). The great deal about these regions is that it allows for perfect matching between your input tiles and your final output. Also WM allows you to render and output specific regions, and when batching multiple regions it uses all your CPU cores in parallel, yay.
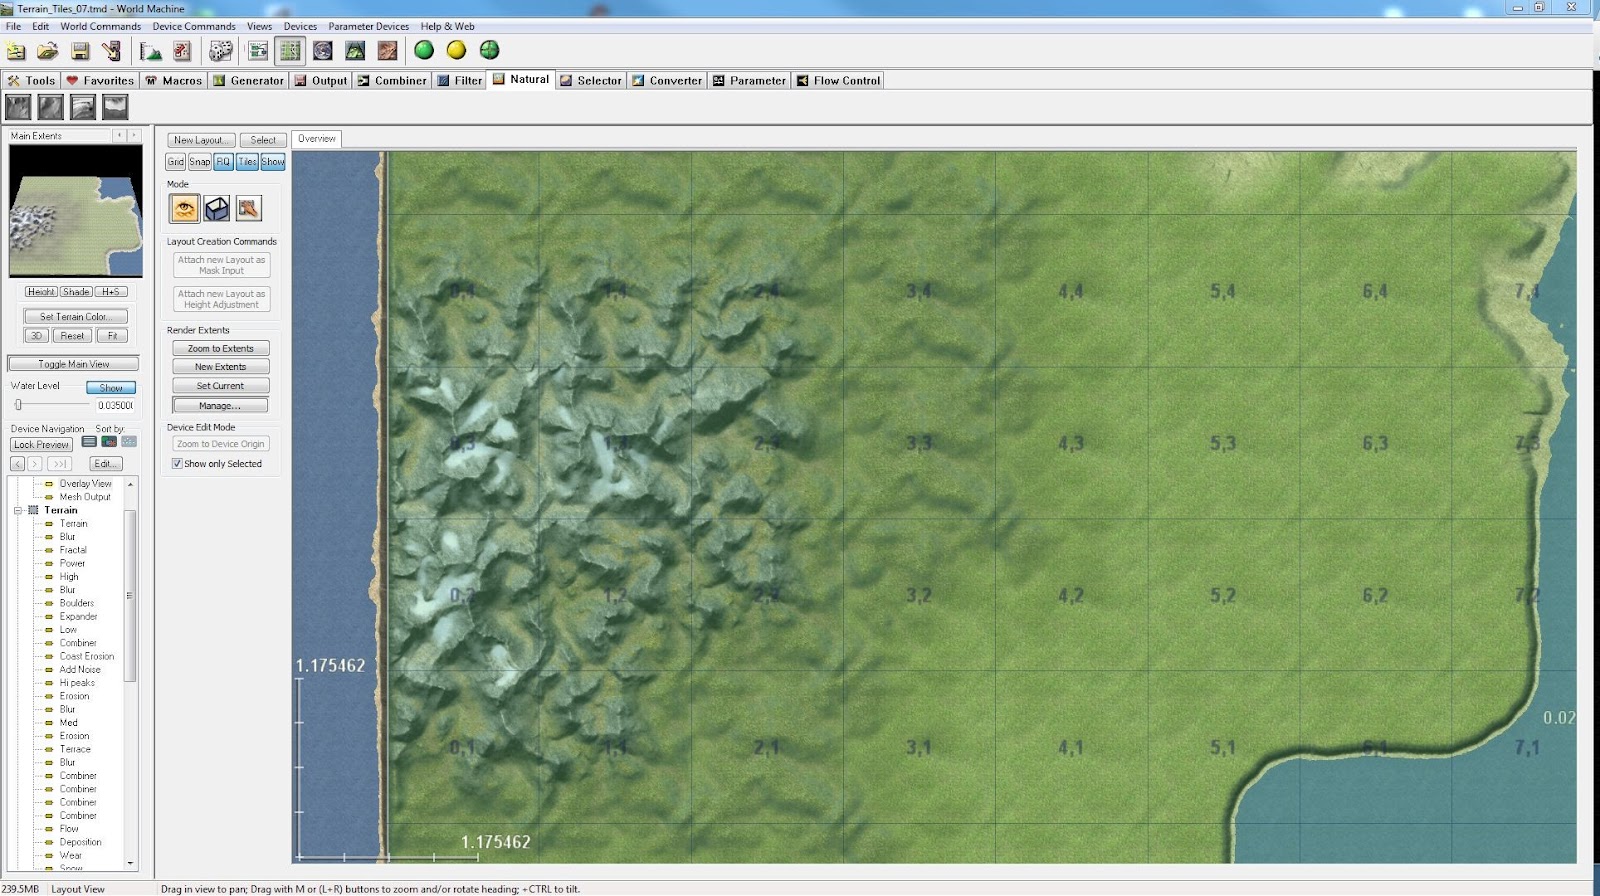
In the above screenshot you can see the effect of the WM graph on my tileset.
You can also explore details in perspective with a real-time preview renderer:

I will need to improve my generation graph a lot for generating the final assets, but this will do for now.
Let's now have a look at the output data. For each meaningful region, I exported a color and height-map (16 bits) file.
Here's the highest mountains tile height-map in Photoshop:

The main problem here is that even if the base tileset was perfectly tiling, some of the processes that were added in WM broke that tiling. Such as erosion which has some random factor and can potentially leak on another tile. For that reason, I created a Photoshop script to 're-tile' the generated region.
Now I need to generate normals. These are critical for the lighting and need to be precisely computed. For that, I don't want to rely on a 2d process, so instead I import the height-map into Mudbox. The tileable feature is back in Mubbox 2013, so that's even better. This will also give me the opportunity to sculpt some specific feature or add some extra detail when I will be producing the final assets for the game.

I bake the normals in tangent space based on the ground plane (equivalent to world base in Z up):

I process it in Photoshop to prepare it for DXT5 compression by placing the X component into the green channel and the Y component into the alpha channel:

Geometry
Now it's time to talk about the geometry for the terrain. Some engine have the ability to store terrains into an elevation data and generate the geometry on the fly. This is great for memory compression as it only stores a scalar. On the other hand, it requires even sampling, so memory is wasted where it's oversampling low frequency data (i.e. flat or smooth areas).FreshEngine only deals with meshes, which means storing a position vector for each vertex. Meshes however can be adaptatively simplified (offline decimation) to more closely follow the frequency pattern of the data. So all in all, I prefer this approach as it allows capturing very precise, high frequency details only where it is necessary.
WM can export .obj meshes directly. However it cannot decimate. Also my decimation needs to maintain edge borders in order to keep my edges perfectly tileable. I decided to do it in Maya which has all the necessary features.
First I create a mesh with enough resolution for my needs, and less resolution on the borders (as those will be untouched by the decimation):

Then I import my elevation data through Artisan:

Finally, I made a small script that in one clic decimates the internal faces while leaving intact the border edge:

Placing textures
In a traditional height map terrain, texture coordinates (UV) are implicit. That is they are based on the XZ position of the terrain sample. With regular mesh texture mapping, you need to explicitly store UVs for each vertex. Not only that but when doing tangent-space normal mapping you need a normal and at least a tangent for computing your tangent basis (depending on the need, you can compute the binormal on the fly or store it).As my tiles have all a fixed size, I can create UVs on the fly in my shader, based on the local XZ vertex position, much like height map terrains. Furthermore, I don't need to store a normal and a tangent to create a tangent basis as it is invarient across the tile. I just have to read the direction vector from the mesh transformation matrix and rotate my normals accordingly. In short, all that is actually needed from the mesh vertices is the XYZ position.

Now let's instantiate this tile a few times and rotating them. A few cracks are still there and need to be fixed:

This can be fixed easily in Maya by snapping the points together:

Now I repeat the process for all the tiles. At this point I did not fix all the edges as it is quite time consuming and it's not worth it at this point since these are not the final assets.

The only thing left to do it to create a smaller version of the tiles to create a tileset that can be used in Tiled to create the level:

And now, time for testing. It is really surprising at first because I was already used to the two building heights I had in my previous tests, but here there are various heights so it is more difficult to read. My conclusion is that I need to enforce some readable altitudes by scaling some peaks to fixed heights in Mudbox.
So please don't mind the cracks between tiles, again this is temporary and will be removed once I produce the final assets.
Thank you for your patience reading this extremely long post ! Feel free to comment or ask any question.
just a question: what do you think about Blender and Gimp instead of Maya and Photoshop as development tools, in your opinion? how far did you try it and imagine these software-libre will replace these proprietary alternatives?
ReplyDeleteI don't have experience with Gimp, and very little with Blender but I have a student working on his project using Blender, and from what I've seen it's a very capable piece of software. I think there are many possibilities nowadays for developing using free software, and that also includes free game engines. Of course, knowing how the industry standard tools work is always a plus, but it's by no mean mandatory, especially if you go indie.
ReplyDeleteHowever I don't think free software will completely replace professional tools, simply because they need to do a lot of R&D and also provide support for large clients, and that costs a lot. That cost has to be passed to customers at some point.
Dear Frank, thank you so much for taking time to write this tutorial about your process in making tilable terrain.
ReplyDeleteThis is a very interesting and very valuable piece of informations.
I was wondering what should i do for making a huge terrain for my flying game, and your article just convinced me to use a similar system for my game!
Thanks for the nice comments. Would be happy to see the result once you've implemented your own terrain system, if you don't mind sharing.
ReplyDeleteHi Frank, i am the person who posted last day :)
ReplyDeleteOf course will be please to share if i get a nice result, but i am still at the test phase for now, and i am experiencing some issues.
Actually not really a technical issue but more a graphical issue.
So basically i make my terrain tile using Bryce3d (one of the few program that work on my MAC)
I then bake the terrain high poly mesh informations on a very low poly mesh (to get the normal map).
Again technically everything is fine but the problem i have is that my diffuse texture is so small for the terrain tile size.
Ususally when using terrain and not mesh, for a 512*512 heightmap, using a 1024*1024 terrain size give you very good details.
2 meters per pixel.
And when using terrains, the textures can be tiled so they can look very detailed even if the camera is close to the ground.
However, when using mesh, the texture look very very dirty for 1024 * 1024 terrain tile.
May i ask how large are your terrain tiles ?
Thanks for any help :)
My tiles are each 2048 by 2048. I made it that way so even when my plane is flying low and the camera is zooming, I still have a very good texture definition (roughly 1/1 texel/pixel ratio) in 1080p resolution.
ReplyDeleteHi Franck, awesome tutorial.
ReplyDeleteDo you happen to have some more insights into how you've actually painted the tiles in photoshop? Especially dealing with seams in hard to notice areas where the heights change smoothly?
Also some more indepth information about WM and tiled world building would be awesome.
Thanks for the nice comment and sorry for the late reply.
DeleteUnfortunately, I've not been able to work on this project for a while. To deal with seams in photoshop, if my memory serves me correctly, I used a common border profile and used an action that created a short gradient as a mask for each side of the textue and used that mask to blend the common profile to every sides.